> ## Documentation Index
> Fetch the complete documentation index at: https://docs-dev-eval-flywheel-swift-quickstart.mintlify.site/llms.txt
> Use this file to discover all available pages before exploring further.
# IDプロバイダーAPIを呼び出す
> 外部IDプロバイダーAPIを呼び出す方法について説明します。
export const AuthCodeGroup = ({children, dropdown}) => {
const [processedChildren, setProcessedChildren] = useState(children);
useEffect(() => {
let unsubscribe = null;
function init() {
unsubscribe = window.autorun(() => {
const processChildren = node => {
if (typeof node === "string") {
let processedNode = node;
for (const [key, value] of window.rootStore.variableStore.values.entries()) {
const escapedKey = key.replaceAll(/[.*+?^${}()|[\]\\]/g, (String.raw)`\$&`);
processedNode = processedNode.replaceAll(new RegExp(escapedKey, "g"), value);
}
return processedNode;
} else if (Array.isArray(node)) {
return node.map(processChildren);
} else if (node && node.props && node.props.children) {
return {
...node,
props: {
...node.props,
children: processChildren(node.props.children)
}
};
}
return node;
};
setProcessedChildren(processChildren(children));
});
}
if (window.rootStore) {
init();
} else {
window.addEventListener("adu:storeReady", init);
}
return () => {
window.removeEventListener("adu:storeReady", init);
unsubscribe?.();
};
}, [children]);
return {processedChildren};
};
export const AuthCodeBlock = ({filename, icon, language, highlight, children}) => {
const [displayText, setDisplayText] = useState(children);
const [copyText, setCopyText] = useState(children);
const wrapperRef = React.useRef(null);
useEffect(() => {
let unsubscribe = null;
function init() {
if (!window.autorun || !window.rootStore) {
return;
}
unsubscribe = window.autorun(() => {
let processedChildrenForDisplay = children;
let processedChildrenForCopy = children;
for (const [key, value] of window.rootStore.variableStore.values.entries()) {
const escapedKey = key.replaceAll(/[.*+?^${}()|[\]\\]/g, (String.raw)`\$&`);
let displayValue = value;
if (key === "{yourClientSecret}" && value !== "{yourClientSecret}") {
displayValue = value.substring(0, 3) + "*****MASKED*****";
}
processedChildrenForDisplay = processedChildrenForDisplay.replaceAll(new RegExp(escapedKey, "g"), displayValue);
processedChildrenForCopy = processedChildrenForCopy.replaceAll(new RegExp(escapedKey, "g"), value);
}
setDisplayText(processedChildrenForDisplay);
setCopyText(processedChildrenForCopy);
});
}
if (window.rootStore) {
init();
} else {
window.addEventListener("adu:storeReady", init);
}
return () => {
window.removeEventListener("adu:storeReady", init);
unsubscribe?.();
};
}, [children]);
useEffect(() => {
if (!wrapperRef.current) return;
const originalWriteText = navigator.clipboard.writeText.bind(navigator.clipboard);
let isOverriding = false;
const handleClick = e => {
const button = e.target.closest('[data-testid="copy-code-button"]');
if (!button || !wrapperRef.current.contains(button)) return;
isOverriding = true;
navigator.clipboard.writeText = text => {
if (isOverriding) {
isOverriding = false;
navigator.clipboard.writeText = originalWriteText;
return originalWriteText(copyText);
}
return originalWriteText(text);
};
setTimeout(() => {
if (isOverriding) {
isOverriding = false;
navigator.clipboard.writeText = originalWriteText;
}
}, 100);
};
const wrapper = wrapperRef.current;
wrapper.addEventListener('click', handleClick, true);
return () => {
wrapper.removeEventListener('click', handleClick, true);
if (navigator.clipboard.writeText !== originalWriteText) {
navigator.clipboard.writeText = originalWriteText;
}
};
}, [copyText]);
return
{displayText}
;
};
FacebookやGitHubなどの外部IDプロバイダー(IdP)でユーザーを正常に認証すると、多くの場合、IdPはAuth0に返すユーザープロファイルにアクセストークンを含めます。
このトークンを取得して使用し、IdPのAPIを呼び出すことができます。
ここでは、任意のIdPとの接続をすでに構成したものと仮定しています。まだ構成していない場合は、「[Auth0が対応しているIDプロバイダー](/docs/ja-jp/authenticate/identity-providers/social-identity-providers)」を確認し、任意のIdPを選んで、構成の手順に従ってください。
これから説明する手順は、コードがバックエンドまたはフロントエンドのどちらで実行されるかによって異なります。
* コードがバックエンドで実行される場合、サーバーがシークレットを安全に保存できると想定できます(後でわかるように、バックエンドシナリオではシークレットを使用します)。その場合は、この記事の[[backend section(バックエンドのセクション)]](#from-the-backend)に進んでください。
* コードがフロントエンドで実行される場合(たとえば、SPA、ネイティブデスクトップ、モバイルアプリなど)、アプリは資格情報を安全に保持できないため、別のアプローチに従う必要があります。その場合は、この記事の[[frontend section(フロントエンド)]](#from-the-frontend)に進んでください。
## バックエンドから
ユーザーを認証すると、IdPは通常、Auth0に返すユーザープロファイルにアクセストークンを含めます。
セキュリティとコンプライアンス上の理由から、Auth0はこのトークンをユーザープロファイルの一部としてアプリに送信しません。これを取得するには、Auth0 Management APIにアクセスして、ユーザーの完全なプロファイルを取得する必要があります。
1. [[Auth0 Management API]](/docs/ja-jp/api/management/v2)を呼び出すためのアクセストークンを取得します。
2. ステップ1で取得したアクセストークンを使用して、Auth0 Management APIの[[Get Users by ID endpoint(IDエンドポイントによるユーザー取得)]](/docs/ja-jp/api/management/v2#!/Users/get_users_by_id)を呼び出します。このエンドポイントは、IdPアクセストークンを含む完全なユーザープロファイルを返します。
3. 応答からIdPアクセストークンを抽出し、それを使用してIdPのAPIを呼び出します。
### ステップ1:トークンを取得
[Management API](/docs/ja-jp/api/management/v2)を呼び出すには、アクセストークンが必要です。
#### Management APIのテストアプリケーションを作成
[Management APIv2 Token](/docs/ja-jp/api/management/v2/tokens)(Management APIv2トークン)を初めて要求する場合は、Management APIを呼び出すために使用できるアプリケーションを作成して構成する必要があります。
1. [[Auth0 Dashboard]>[Applications(アプリケーション)]>[API]](https://manage.auth0.com/#/apis)に移動して、[[Auth0 Management API]](https://manage.auth0.com/#/apis/management/authorized-clients)を選択します。
2. **[API Explorer(API エクスプローラー)]** ビューを選択し、\*\* [Create & Authorize a Test Application(テストアプリケーションの作成と承認)]\*\* をクリックします。
これにより、新しいアプリケーションが作成され、Management APIのすべてのスコープが付与されます。つまり、このアプリケーション用に生成されたトークンは、すべてのManagement APIエンドポイントにアクセスできるようになります。
このボタンが表示されない場合は、Management APIに少なくとも1つの認可済みアプリケーションがすでに存在しています。既存のアプリケーションのスコープを更新して使用するか、以下の手順で新しいものを作成してください。
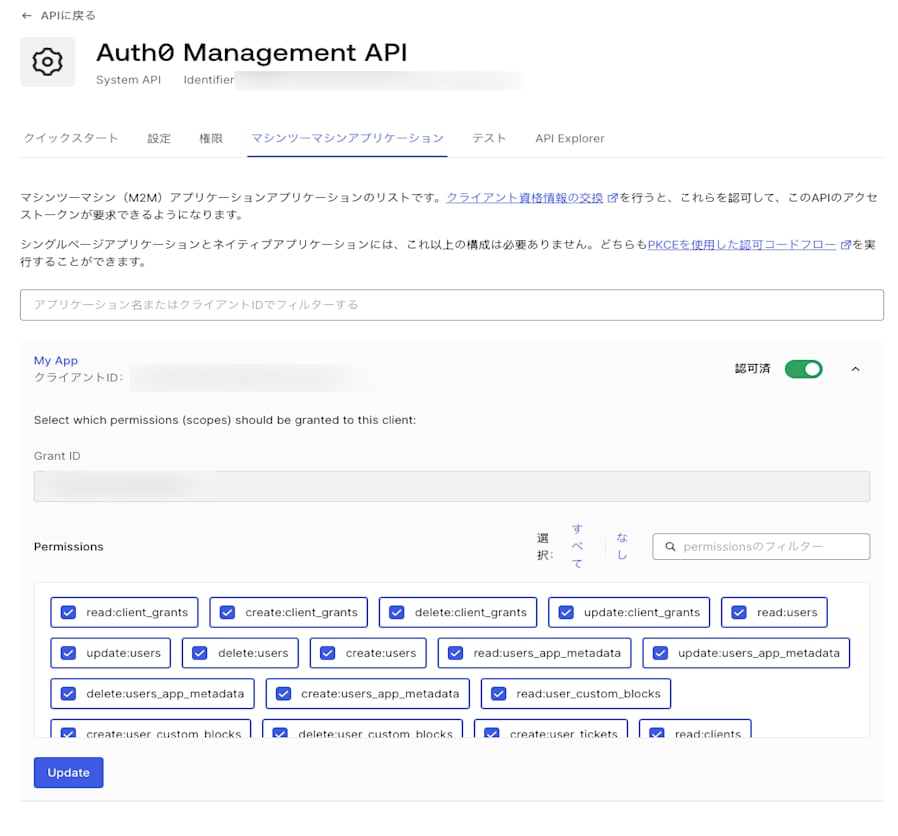
1. [[Auth0 Dashboard]>[Applications(アプリケーション)]>[Applications(アプリケーション)]](https://manage.auth0.com/#/applications)に移動して、**[Create Application(アプリケーションの作成)]** を選択します。
2. **[Machine to Machine Applications(マシンツーマシンアプリケーション)]** を選択して **[Create(作成)]** をクリックします。
3. **[Select an API(APIの選択)]** ドロップダウンから [`Auth0 Management API`]を選択します。
4. 必要なスコープを有効にして、**[Authorize(認可)]** を選択します。
5. **API** ビューを選択して、\*\* Auth0 Management API\*\* を有効に設定します。
セキュリティ上の理由から、使用するアプリケーションには必要なスコープのみを割り当てるようにしてください。このケースで言うと、必要なスコープは、`read:users`と`read:user_idp_tokens`です。必要なスコープは[Management API Explorer](/docs/ja-jp/api/management/v2)でエンドポイントごとにリストされています。
[登録済みのAuth0 Management API](https://manage.auth0.com/#/apis/management/authorized-clients)からスコープを付与または削除するには、[**[Machine to Machine Applications(マシンツーマシンアプリケーション)]** ビュー](https://manage.auth0.com/#/apis/management/authorized-clients)を選択します。
 #### Management APIトークンの取得
これで構成が完了し、Management APIトークンを取得する準備が整いました。
1. 登録済みの[Auth0 Management API](https://manage.auth0.com/#/apis/management/authorized-clients)から、[**[Test(テスト)]** ビュー](https://manage.auth0.com/#/apis/management/test)を選択します。
2. ドロップダウンから **[Application(アプリケーション)]** を選択し、カスタマイズされた変数を使用してすぐに使用できるスニペットを事前に設定します。
3. スニペットの優先言語を選択し、コピーして実行します。
4. 応答から`access_token`プロパティを抽出します。これは、Management APIにアクセスするために使用します。
スニペットは、`POST`操作を[Auth0の認証APIの/oauth/tokenエンドポイント](/docs/ja-jp/api/authentication#client-credentials)に **OAuth 2.0クライアント資格情報付与** を使って実行します。これはマシンツーマシンプロセスがAPIへのアクセス時に使用する付与です。フローの詳細については、「[Client Credentials Flow(クライアントの資格情報フロー)](/docs/ja-jp/get-started/authentication-and-authorization-flow/client-credentials-flow)」を参照してください。
#### トークンの有効期限
デフォルトでは、受け取ったトークンの有効期限は24時間(86,400秒)です。これを変更するには、
1. [[Auth0 Dashboard]>[Applications(アプリケーション)]>[API]](https://manage.auth0.com/#/apis)に移動して、[[Auth0 Management API]](https://manage.auth0.com/#/apis/management/authorized-clients)を選択します。
2. **[Settings(設定)]** ビューを選択し、\*\* [Token Expiration (Seconds)(トークンの有効期限(秒))]\*\* フィールドを見つけて新しい値を入力し、**[Save(保存)]** をクリックします。設定できる最大値は2,592,000秒(30日)ですが、デフォルト値のままにしておくことをお勧めします。
次に生成するトークンでは、更新された有効期限が使用されます。
これらのトークンを **取り消すことはできません** 。リスクを最小限に抑えるために、有効期間の短いトークンを発行し、各アプリケーションに必要なスコープのみを付与することをお勧めします。運用環境の場合は、古いトークンの有効期限が切れたときに新しいトークンを取得する、単純なCLIを構成できます。
### ステップ2:完全なユーザープロファイルの取得
ユーザーのプロファイルを取得するには、前のセクションで抽出したアクセストークンを使用して、Management APIの[[Get a User endpoint(ユーザーエンドポイントの取得)]](/docs/ja-jp/api/management/v2#!/Users/get_users_by_id)を呼び出します。
````bash cURL theme={null}
curl --request GET \
--url 'https://{yourDomain}/api/v2/users/%7BuserId%7D' \
--header 'authorization: Bearer {yourAccessToken}'
``` lines
```csharp C#
var client = new RestClient("https://{yourDomain}/api/v2/users/%7BuserId%7D");
var request = new RestRequest(Method.GET);
request.AddHeader("authorization", "Bearer {yourAccessToken}");
IRestResponse response = client.Execute(request);
````
````go Go theme={null}
package main
import (
"fmt"
"net/http"
"io/ioutil"
)
func main() {
url := "https://{yourDomain}/api/v2/users/%7BuserId%7D"
req, _ := http.NewRequest("GET", url, nil)
req.Header.Add("authorization", "Bearer {yourAccessToken}")
res, _ := http.DefaultClient.Do(req)
defer res.Body.Close()
body, _ := ioutil.ReadAll(res.Body)
fmt.Println(res)
fmt.Println(string(body))
}
``` lines
```java Java
HttpResponse response = Unirest.get("https://{yourDomain}/api/v2/users/%7BuserId%7D")
.header("authorization", "Bearer {yourAccessToken}")
.asString();
````
````javascript Node.JS theme={null}
var axios = require("axios").default;
var options = {
method: 'GET',
url: 'https://{yourDomain}/api/v2/users/%7BuserId%7D',
headers: {authorization: 'Bearer {yourAccessToken}'}
};
axios.request(options).then(function (response) {
console.log(response.data);
}).catch(function (error) {
console.error(error);
});
``` lines
```objc Obj-C
#import
NSDictionary \*headers = @{ @"authorization": @"Bearer {yourAccessToken}" };
NSMutableURLRequest \*request = [NSMutableURLRequest requestWithURL:[NSURL URLWithString:@"https://{yourDomain}/api/v2/users/%7BuserId%7D"]
cachePolicy:NSURLRequestUseProtocolCachePolicy
timeoutInterval:10.0];
[request setHTTPMethod:@"GET"];
[request setAllHTTPHeaderFields:headers];
NSURLSession \*session = [NSURLSession sharedSession];
NSURLSessionDataTask \*dataTask = [session dataTaskWithRequest:request
completionHandler:^(NSData \*data, NSURLResponse \*response, NSError \*error) {
if (error) {
NSLog(@"%@", error);
} else {
NSHTTPURLResponse \*httpResponse = (NSHTTPURLResponse \*) response;
NSLog(@"%@", httpResponse);
}
}];
[dataTask resume];
````
````php PHP theme={null}
$curl = curl_init();
curl_setopt_array($curl, [
CURLOPT_URL => "https://{yourDomain}/api/v2/users/%7BuserId%7D",
CURLOPT_RETURNTRANSFER => true,
CURLOPT_ENCODING => "",
CURLOPT_MAXREDIRS => 10,
CURLOPT_TIMEOUT => 30,
CURLOPT_HTTP_VERSION => CURL_HTTP_VERSION_1_1,
CURLOPT_CUSTOMREQUEST => "GET",
CURLOPT_HTTPHEADER => [
"authorization: Bearer {yourAccessToken}"
],
]);
$response = curl_exec($curl);
$err = curl_error($curl);
curl_close($curl);
if ($err) {
echo "cURL Error #:" . $err;
} else {
echo $response;
}
``` lines
```python Python
import http.client
conn = http.client.HTTPSConnection("")
headers = { 'authorization': "Bearer {yourAccessToken}" }
conn.request("GET", "/{yourDomain}/api/v2/users/%7BuserId%7D", headers=headers)
res = conn.getresponse()
data = res.read()
print(data.decode("utf-8"))
````
````ruby Ruby theme={null}
require 'uri'
require 'net/http'
require 'openssl'
url = URI("https://{yourDomain}/api/v2/users/%7BuserId%7D")
http = Net::HTTP.new(url.host, url.port)
http.use_ssl = true
http.verify_mode = OpenSSL::SSL::VERIFY_NONE
request = Net::HTTP::Get.new(url)
request["authorization"] = 'Bearer {yourAccessToken}'
response = http.request(request)
puts response.read_body
``` lines
```swift Swift
import Foundation
let headers = ["authorization": "Bearer {yourAccessToken}"]
let request = NSMutableURLRequest(url: NSURL(string: "https://{yourDomain}/api/v2/users/%7BuserId%7D")! as URL,
cachePolicy: .useProtocolCachePolicy,
timeoutInterval: 10.0)
request.httpMethod = "GET"
request.allHTTPHeaderFields = headers
let session = URLSession.shared
let dataTask = session.dataTask(with: request as URLRequest, completionHandler: { (data, response, error) -> Void in
if (error != nil) {
print(error)
} else {
let httpResponse = response as? HTTPURLResponse
print(httpResponse)
}
})
dataTask.resume()
````
次の値を置き換えます:
* `{userId}`:IdPのAPIを呼び出すユーザーのID。
* `{yourAccessToken}`:前のセクションで抽出したアクセストークン。
- テストの場合には、[[Auth0 Dashboard]>[User Management(ユーザー管理)]>[Users(ユーザー)]](https://manage.auth0.com/#/users)で、ユーザーを見つけることができます。ユーザーを見つけたら、**user\_id** フィールドの値をコピーします。
- 実装の場合には、[IDトークン](/docs/ja-jp/secure/tokens/id-tokens)の`sub`クレームからユーザーIDを抽出するか、認証APIの[/userinfoエンドポイント](/docs/ja-jp/api/authentication#get-user-info)を呼び出して、`user_id`応答プロパティからユーザーIDを抽出します。
### ステップ3:IdPアクセストークンの抽出
IdPのAPIを呼び出すために使用されるアクセストークンは、ユーザーの`ID`配列内にあります。`user.identities[0].access_token`.
Auth0は、特定のIDプロバイダーに対してリフレッシュトークンも保管します。保管されたトークンを使って、IdPから新しいアクセストークンを取得できます。この方法は、BitBucket、Google (OAuth 2.0)、OAuth 2.0、SharePoint、Entra IDで機能します。詳細については、「[IDプロバイダーのアクセストークン](/docs/ja-jp/secure/tokens/access-tokens/identity-provider-access-tokens)」をお読みください。
ほとんどの場合、ユーザーのIDは1つだけですが、ユーザーが異なる接続を使用して複数回サインインしていて、[[account linking(アカウントのリンク)]](/docs/ja-jp/manage-users/user-accounts/user-account-linking/link-user-accounts)を使用している場合は、複数のIDが存在する可能性があります。
このサンプル応答では、ユーザーのIDが1つだけであることがわかります。`google-oauth2`。
```json lines theme={null}
{
"email": "john.doe@test.com",
"email_verified": true,
"name": "John Doe",
"given_name": "John",
"family_name": "Doe",
"picture": "https://myavatar/photo.jpg",
"gender": "male",
"locale": "en",
"updated_at": "2017-03-15T07:14:32.451Z",
"user_id": "google-oauth2|111199914890750704174",
"nickname": "john.doe",
"identities": [
{
"provider": "google-oauth2",
"access_token": "ya29.GlsPBCS6ahokDlgCYnVLnDKNE71HBXPEzNhAPoKJLAGKDSe1De3_xclahNcdZXoU-26hCpa8h6240TV86dtaEQ4ZWoeeZduHDq_yeu9QyQqUr--S9B2CR9YJrLTD",
"expires_in": 3599,
"user_id": "111199914890750704174",
"connection": "google-oauth2",
"isSocial": true
}
],
"created_at": "2017-03-15T07:13:41.134Z",
"last_ip": "127.0.0.1",
"last_login": "2017-03-15T07:14:32.451Z",
"logins_count": 99
}
```
これで、IdPのAPIを呼び出す準備ができました。その方法の詳細については、IdPのドキュメントを参照してください。
IdPトークンをクライアント側のアプリケーションに公開しないでください。アプリケーションがパブリックの場合は、この記事の[フロントエンドのセクション](#from-the-frontend)を参照してください。
IDプロバイダーアクセストークンの特定のスコープを要求する方法については、「[スコープ/権限を追加してIPプロバイダーのAPIを呼び出す](/docs/ja-jp/authenticate/identity-providers/adding-scopes-for-an-external-idp)」をお読みください。
## フロントエンドから
パブリックアプリケーション(SPA、ネイティブデスクトップ、またはモバイルアプリケーション)を使用している場合は、ここを参照してください。
フロントエンドアプリを使用する場合、フロントエンドアプリは **資格情報を安全に保持できない** パブリックアプリケーションであるため、IdP APIを呼び出すプロセスはバックエンドプロセスとは異なります。SPAコードは表示および変更でき、ネイティブ/モバイルアプリは逆コンパイルおよび検査できるため、秘密鍵やパスワードなどの機密情報を保持することはできません。
具体的には、バックエンドプロセスの最初のステップで`/oauth/token`を呼び出すために使用するマシンツーマシンアプリケーションの **[Client Secret(クライアントシークレット)]** を安全に保持できません。
代わりに、バックエンドのプロキシを構築し、それをAPIとしてアプリケーションに公開する必要があります。
### プロキシの構築
まず、この記事の[backend section](#from-the-backend)(バックエンド)セクションに記載されている手順を実装するプロセスをバックエンドに構築し、それをAPIとしてアプリケーションに公開します。
IdPのAPIは同じバックエンドプロセスから呼び出すため、アクセストークンはパブリックアプリケーションに公開されません。
次に、[Authorization Code Flow with Proof Key for Code Exchange (PKCE)](/docs/ja-jp/get-started/authentication-and-authorization-flow/authorization-code-flow-with-pkce)(コード交換用の証明キー(PKCE)を使用した認可コードフロー)を使用して、パブリックアプリケーションからプロキシAPIを呼び出します。
以前にこれを実装したことがないのであれば、[APIを使ったシングルページアプリケーション(SPA)](/docs/ja-jp/get-started/architecture-scenarios/spa-api)アーキテクチャ のシナリオが役に立つかもしれません。さまざまなシナリオを取り上げて、Auth0を構成する方法、SPAからAPIを呼び出す方法、API検証の実装方法を説明しています。[Angular 2](https://github.com/auth0-samples/auth0-pnp-exampleco-timesheets/tree/master/timesheets-spa/angular)と[Node.js](https://github.com/auth0-samples/auth0-pnp-exampleco-timesheets/tree/master/timesheets-api/node)を使ったサンプルもあります。
また、[APIを使ったモバイルアプリケーション](/docs/ja-jp/get-started/architecture-scenarios/mobile-api)のバリエーション(サンプルでは[Android](https://github.com/auth0-samples/auth0-pnp-exampleco-timesheets/tree/master/timesheets-mobile/android)と[Node.js](https://github.com/auth0-samples/auth0-pnp-exampleco-timesheets/tree/master/timesheets-api/node)を使用)もあります。
#### Management APIトークンの取得
これで構成が完了し、Management APIトークンを取得する準備が整いました。
1. 登録済みの[Auth0 Management API](https://manage.auth0.com/#/apis/management/authorized-clients)から、[**[Test(テスト)]** ビュー](https://manage.auth0.com/#/apis/management/test)を選択します。
2. ドロップダウンから **[Application(アプリケーション)]** を選択し、カスタマイズされた変数を使用してすぐに使用できるスニペットを事前に設定します。
3. スニペットの優先言語を選択し、コピーして実行します。
4. 応答から`access_token`プロパティを抽出します。これは、Management APIにアクセスするために使用します。
スニペットは、`POST`操作を[Auth0の認証APIの/oauth/tokenエンドポイント](/docs/ja-jp/api/authentication#client-credentials)に **OAuth 2.0クライアント資格情報付与** を使って実行します。これはマシンツーマシンプロセスがAPIへのアクセス時に使用する付与です。フローの詳細については、「[Client Credentials Flow(クライアントの資格情報フロー)](/docs/ja-jp/get-started/authentication-and-authorization-flow/client-credentials-flow)」を参照してください。
#### トークンの有効期限
デフォルトでは、受け取ったトークンの有効期限は24時間(86,400秒)です。これを変更するには、
1. [[Auth0 Dashboard]>[Applications(アプリケーション)]>[API]](https://manage.auth0.com/#/apis)に移動して、[[Auth0 Management API]](https://manage.auth0.com/#/apis/management/authorized-clients)を選択します。
2. **[Settings(設定)]** ビューを選択し、\*\* [Token Expiration (Seconds)(トークンの有効期限(秒))]\*\* フィールドを見つけて新しい値を入力し、**[Save(保存)]** をクリックします。設定できる最大値は2,592,000秒(30日)ですが、デフォルト値のままにしておくことをお勧めします。
次に生成するトークンでは、更新された有効期限が使用されます。
これらのトークンを **取り消すことはできません** 。リスクを最小限に抑えるために、有効期間の短いトークンを発行し、各アプリケーションに必要なスコープのみを付与することをお勧めします。運用環境の場合は、古いトークンの有効期限が切れたときに新しいトークンを取得する、単純なCLIを構成できます。
### ステップ2:完全なユーザープロファイルの取得
ユーザーのプロファイルを取得するには、前のセクションで抽出したアクセストークンを使用して、Management APIの[[Get a User endpoint(ユーザーエンドポイントの取得)]](/docs/ja-jp/api/management/v2#!/Users/get_users_by_id)を呼び出します。
````bash cURL theme={null}
curl --request GET \
--url 'https://{yourDomain}/api/v2/users/%7BuserId%7D' \
--header 'authorization: Bearer {yourAccessToken}'
``` lines
```csharp C#
var client = new RestClient("https://{yourDomain}/api/v2/users/%7BuserId%7D");
var request = new RestRequest(Method.GET);
request.AddHeader("authorization", "Bearer {yourAccessToken}");
IRestResponse response = client.Execute(request);
````
````go Go theme={null}
package main
import (
"fmt"
"net/http"
"io/ioutil"
)
func main() {
url := "https://{yourDomain}/api/v2/users/%7BuserId%7D"
req, _ := http.NewRequest("GET", url, nil)
req.Header.Add("authorization", "Bearer {yourAccessToken}")
res, _ := http.DefaultClient.Do(req)
defer res.Body.Close()
body, _ := ioutil.ReadAll(res.Body)
fmt.Println(res)
fmt.Println(string(body))
}
``` lines
```java Java
HttpResponse response = Unirest.get("https://{yourDomain}/api/v2/users/%7BuserId%7D")
.header("authorization", "Bearer {yourAccessToken}")
.asString();
````
````javascript Node.JS theme={null}
var axios = require("axios").default;
var options = {
method: 'GET',
url: 'https://{yourDomain}/api/v2/users/%7BuserId%7D',
headers: {authorization: 'Bearer {yourAccessToken}'}
};
axios.request(options).then(function (response) {
console.log(response.data);
}).catch(function (error) {
console.error(error);
});
``` lines
```objc Obj-C
#import
NSDictionary \*headers = @{ @"authorization": @"Bearer {yourAccessToken}" };
NSMutableURLRequest \*request = [NSMutableURLRequest requestWithURL:[NSURL URLWithString:@"https://{yourDomain}/api/v2/users/%7BuserId%7D"]
cachePolicy:NSURLRequestUseProtocolCachePolicy
timeoutInterval:10.0];
[request setHTTPMethod:@"GET"];
[request setAllHTTPHeaderFields:headers];
NSURLSession \*session = [NSURLSession sharedSession];
NSURLSessionDataTask \*dataTask = [session dataTaskWithRequest:request
completionHandler:^(NSData \*data, NSURLResponse \*response, NSError \*error) {
if (error) {
NSLog(@"%@", error);
} else {
NSHTTPURLResponse \*httpResponse = (NSHTTPURLResponse \*) response;
NSLog(@"%@", httpResponse);
}
}];
[dataTask resume];
````
````php PHP theme={null}
$curl = curl_init();
curl_setopt_array($curl, [
CURLOPT_URL => "https://{yourDomain}/api/v2/users/%7BuserId%7D",
CURLOPT_RETURNTRANSFER => true,
CURLOPT_ENCODING => "",
CURLOPT_MAXREDIRS => 10,
CURLOPT_TIMEOUT => 30,
CURLOPT_HTTP_VERSION => CURL_HTTP_VERSION_1_1,
CURLOPT_CUSTOMREQUEST => "GET",
CURLOPT_HTTPHEADER => [
"authorization: Bearer {yourAccessToken}"
],
]);
$response = curl_exec($curl);
$err = curl_error($curl);
curl_close($curl);
if ($err) {
echo "cURL Error #:" . $err;
} else {
echo $response;
}
``` lines
```python Python
import http.client
conn = http.client.HTTPSConnection("")
headers = { 'authorization': "Bearer {yourAccessToken}" }
conn.request("GET", "/{yourDomain}/api/v2/users/%7BuserId%7D", headers=headers)
res = conn.getresponse()
data = res.read()
print(data.decode("utf-8"))
````
````ruby Ruby theme={null}
require 'uri'
require 'net/http'
require 'openssl'
url = URI("https://{yourDomain}/api/v2/users/%7BuserId%7D")
http = Net::HTTP.new(url.host, url.port)
http.use_ssl = true
http.verify_mode = OpenSSL::SSL::VERIFY_NONE
request = Net::HTTP::Get.new(url)
request["authorization"] = 'Bearer {yourAccessToken}'
response = http.request(request)
puts response.read_body
``` lines
```swift Swift
import Foundation
let headers = ["authorization": "Bearer {yourAccessToken}"]
let request = NSMutableURLRequest(url: NSURL(string: "https://{yourDomain}/api/v2/users/%7BuserId%7D")! as URL,
cachePolicy: .useProtocolCachePolicy,
timeoutInterval: 10.0)
request.httpMethod = "GET"
request.allHTTPHeaderFields = headers
let session = URLSession.shared
let dataTask = session.dataTask(with: request as URLRequest, completionHandler: { (data, response, error) -> Void in
if (error != nil) {
print(error)
} else {
let httpResponse = response as? HTTPURLResponse
print(httpResponse)
}
})
dataTask.resume()
````
次の値を置き換えます:
* `{userId}`:IdPのAPIを呼び出すユーザーのID。
* `{yourAccessToken}`:前のセクションで抽出したアクセストークン。
- テストの場合には、[[Auth0 Dashboard]>[User Management(ユーザー管理)]>[Users(ユーザー)]](https://manage.auth0.com/#/users)で、ユーザーを見つけることができます。ユーザーを見つけたら、**user\_id** フィールドの値をコピーします。
- 実装の場合には、[IDトークン](/docs/ja-jp/secure/tokens/id-tokens)の`sub`クレームからユーザーIDを抽出するか、認証APIの[/userinfoエンドポイント](/docs/ja-jp/api/authentication#get-user-info)を呼び出して、`user_id`応答プロパティからユーザーIDを抽出します。
### ステップ3:IdPアクセストークンの抽出
IdPのAPIを呼び出すために使用されるアクセストークンは、ユーザーの`ID`配列内にあります。`user.identities[0].access_token`.
Auth0は、特定のIDプロバイダーに対してリフレッシュトークンも保管します。保管されたトークンを使って、IdPから新しいアクセストークンを取得できます。この方法は、BitBucket、Google (OAuth 2.0)、OAuth 2.0、SharePoint、Entra IDで機能します。詳細については、「[IDプロバイダーのアクセストークン](/docs/ja-jp/secure/tokens/access-tokens/identity-provider-access-tokens)」をお読みください。
ほとんどの場合、ユーザーのIDは1つだけですが、ユーザーが異なる接続を使用して複数回サインインしていて、[[account linking(アカウントのリンク)]](/docs/ja-jp/manage-users/user-accounts/user-account-linking/link-user-accounts)を使用している場合は、複数のIDが存在する可能性があります。
このサンプル応答では、ユーザーのIDが1つだけであることがわかります。`google-oauth2`。
```json lines theme={null}
{
"email": "john.doe@test.com",
"email_verified": true,
"name": "John Doe",
"given_name": "John",
"family_name": "Doe",
"picture": "https://myavatar/photo.jpg",
"gender": "male",
"locale": "en",
"updated_at": "2017-03-15T07:14:32.451Z",
"user_id": "google-oauth2|111199914890750704174",
"nickname": "john.doe",
"identities": [
{
"provider": "google-oauth2",
"access_token": "ya29.GlsPBCS6ahokDlgCYnVLnDKNE71HBXPEzNhAPoKJLAGKDSe1De3_xclahNcdZXoU-26hCpa8h6240TV86dtaEQ4ZWoeeZduHDq_yeu9QyQqUr--S9B2CR9YJrLTD",
"expires_in": 3599,
"user_id": "111199914890750704174",
"connection": "google-oauth2",
"isSocial": true
}
],
"created_at": "2017-03-15T07:13:41.134Z",
"last_ip": "127.0.0.1",
"last_login": "2017-03-15T07:14:32.451Z",
"logins_count": 99
}
```
これで、IdPのAPIを呼び出す準備ができました。その方法の詳細については、IdPのドキュメントを参照してください。
IdPトークンをクライアント側のアプリケーションに公開しないでください。アプリケーションがパブリックの場合は、この記事の[フロントエンドのセクション](#from-the-frontend)を参照してください。
IDプロバイダーアクセストークンの特定のスコープを要求する方法については、「[スコープ/権限を追加してIPプロバイダーのAPIを呼び出す](/docs/ja-jp/authenticate/identity-providers/adding-scopes-for-an-external-idp)」をお読みください。
## フロントエンドから
パブリックアプリケーション(SPA、ネイティブデスクトップ、またはモバイルアプリケーション)を使用している場合は、ここを参照してください。
フロントエンドアプリを使用する場合、フロントエンドアプリは **資格情報を安全に保持できない** パブリックアプリケーションであるため、IdP APIを呼び出すプロセスはバックエンドプロセスとは異なります。SPAコードは表示および変更でき、ネイティブ/モバイルアプリは逆コンパイルおよび検査できるため、秘密鍵やパスワードなどの機密情報を保持することはできません。
具体的には、バックエンドプロセスの最初のステップで`/oauth/token`を呼び出すために使用するマシンツーマシンアプリケーションの **[Client Secret(クライアントシークレット)]** を安全に保持できません。
代わりに、バックエンドのプロキシを構築し、それをAPIとしてアプリケーションに公開する必要があります。
### プロキシの構築
まず、この記事の[backend section](#from-the-backend)(バックエンド)セクションに記載されている手順を実装するプロセスをバックエンドに構築し、それをAPIとしてアプリケーションに公開します。
IdPのAPIは同じバックエンドプロセスから呼び出すため、アクセストークンはパブリックアプリケーションに公開されません。
次に、[Authorization Code Flow with Proof Key for Code Exchange (PKCE)](/docs/ja-jp/get-started/authentication-and-authorization-flow/authorization-code-flow-with-pkce)(コード交換用の証明キー(PKCE)を使用した認可コードフロー)を使用して、パブリックアプリケーションからプロキシAPIを呼び出します。
以前にこれを実装したことがないのであれば、[APIを使ったシングルページアプリケーション(SPA)](/docs/ja-jp/get-started/architecture-scenarios/spa-api)アーキテクチャ のシナリオが役に立つかもしれません。さまざまなシナリオを取り上げて、Auth0を構成する方法、SPAからAPIを呼び出す方法、API検証の実装方法を説明しています。[Angular 2](https://github.com/auth0-samples/auth0-pnp-exampleco-timesheets/tree/master/timesheets-spa/angular)と[Node.js](https://github.com/auth0-samples/auth0-pnp-exampleco-timesheets/tree/master/timesheets-api/node)を使ったサンプルもあります。
また、[APIを使ったモバイルアプリケーション](/docs/ja-jp/get-started/architecture-scenarios/mobile-api)のバリエーション(サンプルでは[Android](https://github.com/auth0-samples/auth0-pnp-exampleco-timesheets/tree/master/timesheets-mobile/android)と[Node.js](https://github.com/auth0-samples/auth0-pnp-exampleco-timesheets/tree/master/timesheets-api/node)を使用)もあります。